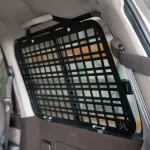
Get Good Gear Window MOLLE Panel Fitting Instructions
Thank you for purchasing the Get Good Gear Window MOLLE Panel for your vehicle! This product is designed to maximize your storage options and enhance the versatility of your setup. With its durable 3mm thick aluminum construction and genuine MOLLE pattern, you can easily attach and organize accessories for all your off-road and overlanding adventures. The installation process is straightforward and can be completed with basic tools. Follow the steps below to securely fit your new MOLLE panels and start customising your space.
Tools Required:
- Phillips head screwdriver
- Flat head screwdriver
- Drill with 7mm drill bit
- Shallow pilot drill bit
- Marker or pen
- Rust preventative spray
- 6mm Allen key
Included Parts:
- Driver side panel
- Passenger side panel
- Driver and passenger side brackets
- Lower brackets (x4)
- M6 Button Socket Screws (various sizes)
- M6 Flange Serrated Hex Nuts
- M6 Washers
Step-by-Step Installation:
Step 1: Prepare for Installation
- Unpack your Get Good Gear Window MOLLE Panel kit and verify that all components are included.
- Gather all required tools.
Step 2: Remove Plastic Trim
- Using a flat head screwdriver, remove the plastic trim on the passenger side where the MOLLE panel will be mounted.
Step 3: Remove Passenger Grab Handle
- Use a Phillips head screwdriver to remove the grab handle.
- Note: We recommend not refitting the grab handle once the MOLLE panel is installed as it may obstruct functionality.
Step 4: Attach the Bracket
- Install the provided top mounting bracket using the supplied hardware. Loosely fit the MOLLE panel to the bracket, ensuring everything is aligned correctly.
Step 5: Fitting the Lower Bracket
- Attach the lower “T” bracket to the MOLLE panel. Check if your vehicle has pre-existing factory mounting holes.
- Depending on your vehicle’s model year, these holes may align, or you may need to drill a new hole.
Step 6: Drilling a New Hole (If Required)
- If the factory hole is not available, use the T-bracket to mark the location for a new 7mm hole.
- Drill carefully using a shallow pilot bit followed by a 7mm drill bit. Be cautious not to drill too far and damage the outer panel.
- After drilling, apply rust preventative spray to the exposed metal.
Step 7: Final Fitment
- Once the lower brackets are secured, tighten all bolts, ensuring the panel is level and secure.
- You may choose to trim the plastic trim around the mounting points for a cleaner fit, but this is optional.
Step 8: Install Driver Side Panel
- Repeat the above steps for the driver side.
You’re Done! Your Get Good Gear Window MOLLE Panels are now installed and ready to use. Enjoy the additional storage and functionality these panels provide. Be sure to explore our range of MOLLE accessories to fully customize your setup.


